.png?width=246&height=70&name=Kinetech%20PM%20246%20x%2070%20(1).png)

This post originally appeared on Mendix.com November 12th, 2013.
Thanks to Mendix’s continued rapid growth (109% in the first half of 2013 alone), we are constantly training personnel on how to use the Mendix App Platform and its visual, model-driven development capabilities. As we work to continually increase the competency of our new customers, partners, and employees, I have seen a few recurring mistakes that beginners should avoid. Here are nine pro tips to help beginners become better lowcode developlers with Mendix.
Please note: if you are a certified Mendix Engineer, you may want to scan the list of nine tips as a refresher. If you have not yet taken the Mendix Apprenticeship class, some of the concepts may not be familiar to you. In that case, bookmark this post and refer back to it afterwards!
1. Understand the Data Model or Question the Relationships
Teams work best when everyone is on the same page. More often than not, intellectual consensus on a specific design ensures that all teams understand the desired functionality as well as the real-world relationships the system is being designed to support. If you do not understand the data model or have questions, ask the solution architect for clarification.
Confusion leads to sloppy modeling (the lowcode equivalent of spaghetti code) which, in turn, leads to rework. The whole point of having a visual model is to facilitate discussion (a picture is worth a thousand words) and increase understanding. Once you build the data model, the application practically builds itself!
I cannot stress just how important this first tip truly is. Model mastery / comprehension will accelerate:
- Constructing sophisticated XPath Constraints
- Building reusable sub-flows
- Designing functional forms
2. Navigate Using the “Right-Click” Go to Form, Microflow, Entity (Data Model) or Find Usage
New Mendix Engineers have a tendency to use the navigation panel on the left to try to find their way around an application. As the application grows and the names of forms and microflows begin to look similar, they sometimes end up creating duplicate forms and flows that do essentially the same thing.
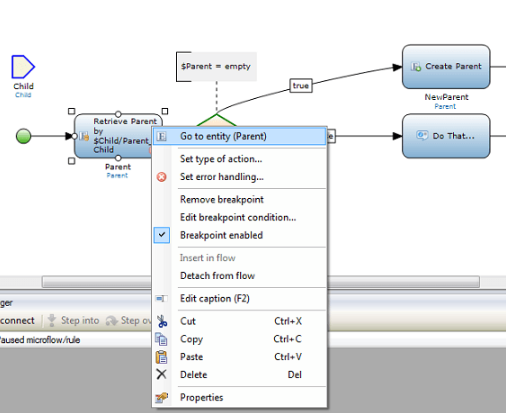 Right Click: Go to Entity (Parent)
.png?t=1478593658884) Right Click: Find Usages
Right Click: Find UsagesUsing the right click to navigate is one of the most critical habits for Mendix beginners to adopt. It will help you increase comprehension of the data model (Go to Entity) and improve your knowledge of the flow of an application. You can also use CTRL "G" to search using the "Go To."
3. Use SubFlows / Reusability
A few key things to discuss and agree upon are:
- When to create a Subflow. A good rule of thumb is as soon as you use something twice, create a Subflow. This will drastically improve maintenance and debugging, and reduce complexity / confusion.
- How to handle validation messages. This may have an impact down the line, particularly for Maintenance and Translation (for multi-lingual applications). For validation messages, I suggest creating subflows that take an input (or inputs) and return a string. This way, you can concatenate messages and reuse validations.
- How to structure Microflows. Again, this seems like a no-brainer, but developers’ styles vary. A simple agreement like, “The happy path of all Microflows should follow the horizontal (true), while any splits should divert to the vertical” will go a long way to making flows easier to understand.
.png?t=1478593658884)
In the microflows above, the orange “splits” differ in their outgoing sequence.
In the top microflow, at the first split, a “true” result from the condition forces the flow up (this is technically not incorrect, but it is confusing for other users). The bottom flow uses a consistent structure with the previously agreed up structure (the happy path follows the horizontal).
4. Agree on Naming Conventions
If you are working on a team to develop an enterprise application, decide on some key naming standards and occasionally audit / perform model review. This periodic routine will decrease maintenance for large teams and projects. The Mendix Apprentice training has some really good content on best practice naming of microflows. If your team has agreed on something more suitable for you, that is fine too; just be consistent. The time spent doing this up front will save significant time down the road in maintenance and debugging. Here are a few conventions I like to use:
- Calc_DescribeMicroflow – Use this naming convention when creating a subFlow that will take an input Parameter(s) and return a value (object, or value). For example: Calc_SumTwoNumbers will take in two values, add them together, and return the sum.
- IVK_DescribeMicroflow – Use this naming convention when calling a subFlow (like the one above) with intent to commit the value. For example, IVK_SumTwoNumbers will pass in both parameters, call the Calc_SumTwoNumbers subFlow, and then commit the value.
- OCh_DescribeMicroflow – Use this naming convention when a user wants changes to be reflected after they modify values on a form and want to see the result refreshed upon committing the value to the database.
5. Use the Debugger
Using Mendix to visually model applications can be very exciting coming from the world of source code. With microflows, you can quickly label and model the business logic of your application.
However, as time goes on (or as you are completing a repetitive microflow), it’s sometimes easy to mislabel a split or retrieve. When this happens, your application may not perform as it appears. The tip here is to ensure you use the debugger to confirm the modeler is manipulating the same entities and attributes that your labels suggest it should. I typically setup my debugger like this:
.png?t=1478593658884) Visual Debugging in Mendix.
Visual Debugging in Mendix.
Left panel depicts - Input parameters /available attribute values for inspection (or confirmation), Middle Panel depicts - control in debugger panel (step into, step over, step out, continue), and Center Panel depicts - microflow with red highlighted subflow indicating where in the execution the application / debugger is.
The Buttons at the bottom (Step Into, Step Over, Step Out, and Continue) allow you to step systematically through your microflow. The Red outline (currently around “Create Parent”) allow you to visualize where in the flow the microflow is attempting to execute. Finally, the variable(s) pane on the left panel allows you to see the actual Entity and Attributes.
Beginners tend to look at their microflows and confidently predict that their logic is sound without realizing the label is not a true indication of the underlying attribute.
6. Minimize Retrieves where Possible
Excessive retrieves / commits can drastically reduce performance in large applications, because they can take up server capacity (especially when multiple users are accessing the application simultaneously). Beginners will commonly use a retrieve then check if it is empty (for a GetOrCreate Subflow for example). A faster and more efficient way to do this is simply to check if the association exists, then act accordingly. Below is a simple data model and then two examples: the first showing a common “beginner” mistake and the second showing a more efficient retrieval.
Simple Data Model - Parent (1) to Child (Many)
Option 1: Incorrect Use of Retrieve
Option 2: Correctly Check if ASSOCIATION Exists before Performing Action.
Both flows accomplish the exact same thing (either returning the Parent of the Child, if it exists, or creating a new one and associating it to the Child).
However, Option 2 is more efficient because the (Business) Engineer understands the Child can have only one Parent (because of the data model); see tip 1! Thus, if the association does not exist in Option 2 ($Child_1/MyFirstModule.Child_Parent = empty) , the engineer eliminates the retrieve and simply goes straight to Creating the $NewParent_1. In complicated models with multiple layers of subflows, minimizing the retrieves will improve performance.
7. X-Path Constraints
This pro tip is related to number 1! X-Path constraints allow you to Constrain data based on the association with other tables. In other words, think of an X-Path constraint as a join between two tables. In order to write X-Path Constraints effectively, you should typically take the shortest possible path to the desired data to eliminate unnecessary joins.
When writing XPath constraints, you can only compare variables to the contents of an association or with the value of an attribute. Furthermore, XPath constraints always consist of an odd number of elements. So [Parent_Child/Child = $Variable] is not possible but you can use: [Parent_Child = $Variable] or [Parent_Child/Child/id = $Variable] or [Parent_Child/Child/Name = $Variable/Name].
8. Account for Null Values
This tip sounds like a no brainer, but as a beginner, it can be easy to forget. Anytime you are performing a calculation (with numbers, dates, etc.) always be sure to check for empty values before performing the calculation. This is particularly important when using On Change microflows. To reference the microflow above (Calc_SumTwoNumbers), the actual calculation you should use is:
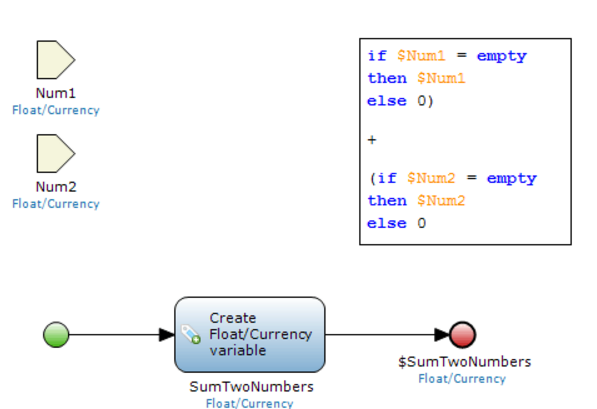
Where the Create Variable above should actually have the first two empty checks before performing the actual calculation and returning the value.
9. Annotate your work and test, test, test.
The last piece of advice applies to any software, and will always ring true. Before launching an application, make sure to test your work thoroughly. Assume your users will attempt to break your code model; so make it as “iron-clad” as possible. The only way to do this is to test thoroughly or automate testing.
What’s your best advice for beginners to Mendix and model-driven development? Do you have a favorite tip or trick that will help beginners get up to speed more quickly?
.png?height=230&name=image%20(70).png)